Tomcat 2 - 주요 설정값 및 테스트

이전 포스팅에서는 Tomcat Connector에 대한 개념을 알아보았다
본 포스팅에서는 Tomcat 주요 설정값 및 시나리오 테스트를 진행할 것이다
Tomcat 주요 설정값
minSpareThreads [Default = 10]
The minimum number of threads always kept running.
This includes both active and idle threads. If not specified, the default of 10 is used.
- 항상 Running 상태를 유지하는 쓰레드의 최소 개수
- active + idle thread를 포함한 개수
- 최소 N개의 Thread는 무조건 존재 (active든 idle이든 합쳐서 최소 N)
maxThreads [Default = 200]
The maximum number of request processing threads to be created by this Connector, which therefore determines the maximum number of simultaneous requests that can be handled.
If not specified, this attribute is set to 200.
- 요청을 처리하기 위해서 Connector에서 생성할 수 있는 최대 쓰레드 개수
처리할 수 있는 최대 동시 요청 수와 연관된 설정
maxConnections
The maximum number of connections that the server will accept and process at any given time.
When this number has been reached, the server will accept, but not process, one further connection.
- This additional connection be blocked until the number of connections being processed falls below maxConnections at which point the server will start accepting and processing new connections again.
Note that once the limit has been reached, the operating system may still accept connections based on the acceptCount setting.
The default value varies by connector type. For NIO and NIO2 the default is 10000. For APR/native, the default is 8192. For NIO/NIO2 only, setting the value to -1, will disable the maxConnections feature and connections will not be counted.
- 서버에서
수락(Accept) & 처리(Process)가능한 최대 Connection 수- maxConnections에 도달하면
단 1개의 Connection만 추가적으로 Accept만 해놓는다 (처리 X)
- maxConnections에 도달하면
- maxConnections에 도달하더라도
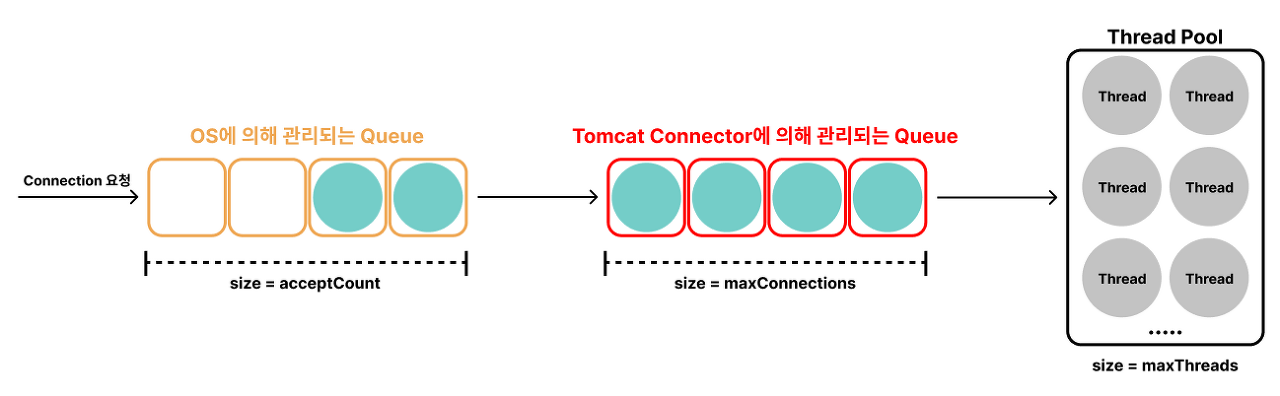
acceptCount 설정에 의해서 OS Level에서 Queuing할 수 있다- ~ maxConnections = Tomcat Connector Queue에서 관리
- over maxConnections ~ acceptCount = OS Level Queue에서 관리
acceptCount [Default = 100]
The maximum length of the operating system provided queue for incoming connection requests when maxConnections has been reached.
The operating system may ignore this setting and use a different size for the queue.
When this queue is full, the operating system may actively refuse additional connections or those connections may time out.
The default value is 100.
- maxConnections을 넘어선 Connection들이 추가적으로 들어오는 경우 OS Level의 Queue에서 관리되는데 해당 Queue의 최대 사이즈
- OS Accept Queue도 가득 찬 경우
- OS 자체에서 추가 Connection을 Refused
- Connection자체가 Timeout
maxKeepAliveRequests [Default = 100]
The maximum number of HTTP requests which can be pipelined until the connection is closed by the server.
Setting this attribute to 1 will disable HTTP/1.0 keep-alive, as well as HTTP/1.1 keep-alive and pipelining.
Setting this to -1 will allow an unlimited amount of pipelined or keep-alive HTTP requests.
If not specified, this attribute is set to 100.
- HTTP/1.1의 Keep Alive Connection을 사용할 때 최대로 유지할 Connection의 개수
- default = 100
- 비활성화 = 1
- 무제한 = -1
keepAliveTimeout
The number of milliseconds this Connector will wait for another HTTP request before closing the connection.
The default value is to use the value that has been set for the connectionTimeout attribute.
Use a value of -1 to indicate no (i.e. infinite) time
- Connection을 닫지 않고 다른 HTTP 요청을 기다리는 최대 시간
connectionTimeout [Default = 60000ms = 60s]
The number of milliseconds this Connector will wait, after accepting a connection, for the request URI line to be presented.
Use a value of -1 to indicate no (i.e. infinite) timeout. The default value is 60000 (i.e. 60 seconds) but note that the standard server.xml that ships with Tomcat sets this to 20000 (i.e. 20 seconds).
Unless disableUploadTimeout is set to false, this timeout will also be used when reading the request body (if any).
- Connection을 Accept 한 후 해당 Connection으로부터 Request URI가 Present될때까지 기다릴 수 있는 최대 시간
- Connection Accept ~ 실제 해당 Connection에 요청이 들어올때까지의 시간
시나리오 테스트
1
2
3
4
5
6
7
8
@RestController
class Api {
    @GetMapping("/api")
    fun hello(): String {
        Thread.sleep(3000)
        return "Hello Thread World"
    }
}
maxThreads & maxConnections & acceptCount간의 관계
1. maxThread = 1
1
2
3
4
5
6
server:
  tomcat:
    threads:
      max: 1
    max-connections: 8192
    accept-count: 100
- 가용 쓰레드가 최대 1개이므로
처리할 수 있는 최대 동시 요청 수역시 1개이다 - 다른 Connection들은 maxConnetions가 여유롭기 때문에 Tomcat Connector Queue에서 대기
2. maxConnections = 1
1
2
3
4
5
6
server:
  tomcat:
    threads:
      max: 200
    max-connections: 1
    accept-count: 100
- maxConnections가 1이므로
서버에서 수락(Accecpt) + 처리(Process)가능한 최대 Connection 역시 1개이다- maxThreads가 200이더라도 수락 + 처리 자체가 1개만 가능하므로 별 의미가 없는 옵션이 되버렸다
- 다른 Connection들은 acceptCount에 의해 OS Level Queue에서 대기
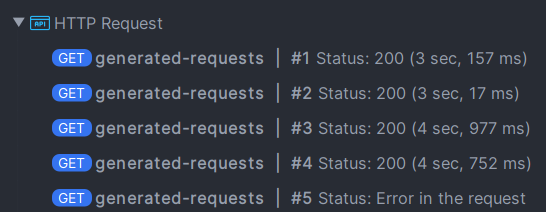
3. maxConnections = acceptCount = 1
1
2
3
4
5
6
server:
  tomcat:
    threads:
      max: 200
    max-connections: 1
    accept-count: 1

Request#3,4,5 = failed: Connection refused: no further information
- Request#1
- Thread 할당해서 처리 (maxConnections = 1)
- Request#2
- acceptCount에 의해서 OS Queue에서 대기
- Request#3,4,5
- maxConnections & acceptCount에 의해서 더이상 Queue에서도 수용할 수 없고 Refused
4. maxThreads = 2 / maxConnections = 3 or 4 / acceptCount = 1
1
2
3
4
5
6
server:
  tomcat:
    threads:
      max: 2
    max-connections: # 3 or 4
    accept-count: 1
실행 결과를 보기전에 예측부터 진행해보자
1
2
3
4
5
6
7
8
9
10
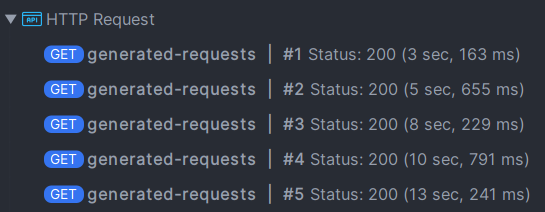
[CaseA - maxConnections = 3]
- maxThreads는 2니까 Request#1,2는 바로 처리
- maxConnections=3이니까 Request#3은 Tomcat Connector Queue에서 대기
- acceptCount=1이니까 Request#4는 OS Level Queue에서 대기
- Request#5는 Refused
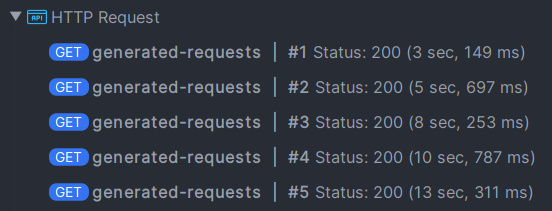
[CaseB - maxConnections = 4]
- maxThreads는 2니까 Request#1,2는 바로 처리
- maxConnections=4니까 Request#3,4는 Tomcat Connector Queue에서 대기
- acceptCount=1이니까 Request#5는 OS Level Queue에서 대기
- maxConnections=3 결과
- maxConnections=4 결과
CaseA & CaseB 모두 예측한대로 진행됨을 확인할 수 있다
동시 요청 테스트
테스트 환경 설정
application.yml
1
2
3
4
5
6
7
8
9
10
11
12
13
14
15
16
17
server:
  tomcat:
    threads:
      max: ${TOMCAT_MAX_THREADS:200}
    max-connections: ${TOMCAT_MAX_CONNECTIONS:8192}
    accept-count: ${TOMCAT_ACCEPT_COUNT:100}
    connection-timeout: ${TOMCAT_CONNECTION_TIMEOUT:20000}

---

docker run -d -p "18080:8080" \
    -e TOMCAT_MAX_THREADS={설정값...} \
    -e TOMCAT_MAX_CONNECTIONS={설정값...} \
    -e TOMCAT_ACCEPT_COUNT={설정값...} \
    -e TOMCAT_CONNECTION_TIMEOUT={설정값...} \
    --name was \
    sjiwon/tomcat-performance
K6를 활용한 테스트 + 메트릭 시각화 (InfluxDB & Grafana)
1
2
3
4
5
6
7
8
9
10
11
12
13
14
15
16
17
18
19
// k6-script.js
import http from 'k6/http';
import {check} from 'k6';

export const options = {
    scenarios: {
        spike: {
            executor: 'constant-vus', // sends VUs at a constant number.
            vus: x, // virtual users
            duration: '1s', //
            gracefulStop: '5m' // Time to wait for iterations to finish executing before stopping them forcefully.
        },
    },
};

export default function () {
    const res = http.get('http://{IP}:18080/api');
    check(res, {'check status 200': (r) => r.status === 200});
};
1
2
3
4
5
6
7
8
9
10
11
12
13
14
15
16
17
18
19
20
version: "3"
services:
  influxdb:
    image: bitnami/influxdb:1.8.5
    container_name: influxdb
    ports:
      - "8086:8086"
      - "8085:8088"
    environment:
      - INFLUXDB_ADMIN_USER_PASSWORD=bitnami123
      - INFLUXDB_ADMIN_USER_TOKEN=admintoken123
      - INFLUXDB_HTTP_AUTH_ENABLED=false
      - INFLUXDB_DB=k6db
    volumes:
      - "./docker/influxdb:/bitnami/influxdb"

  granafa:
    image: bitnami/grafana:latest
    ports:
      - "3000:3000"
- k6 run –out influxdb=http://localhost:8086/{DB} {스크립트 이름}
- k6 run –out influxdb=http://localhost:8086/k6db k6-script.js
1. 200 Requests
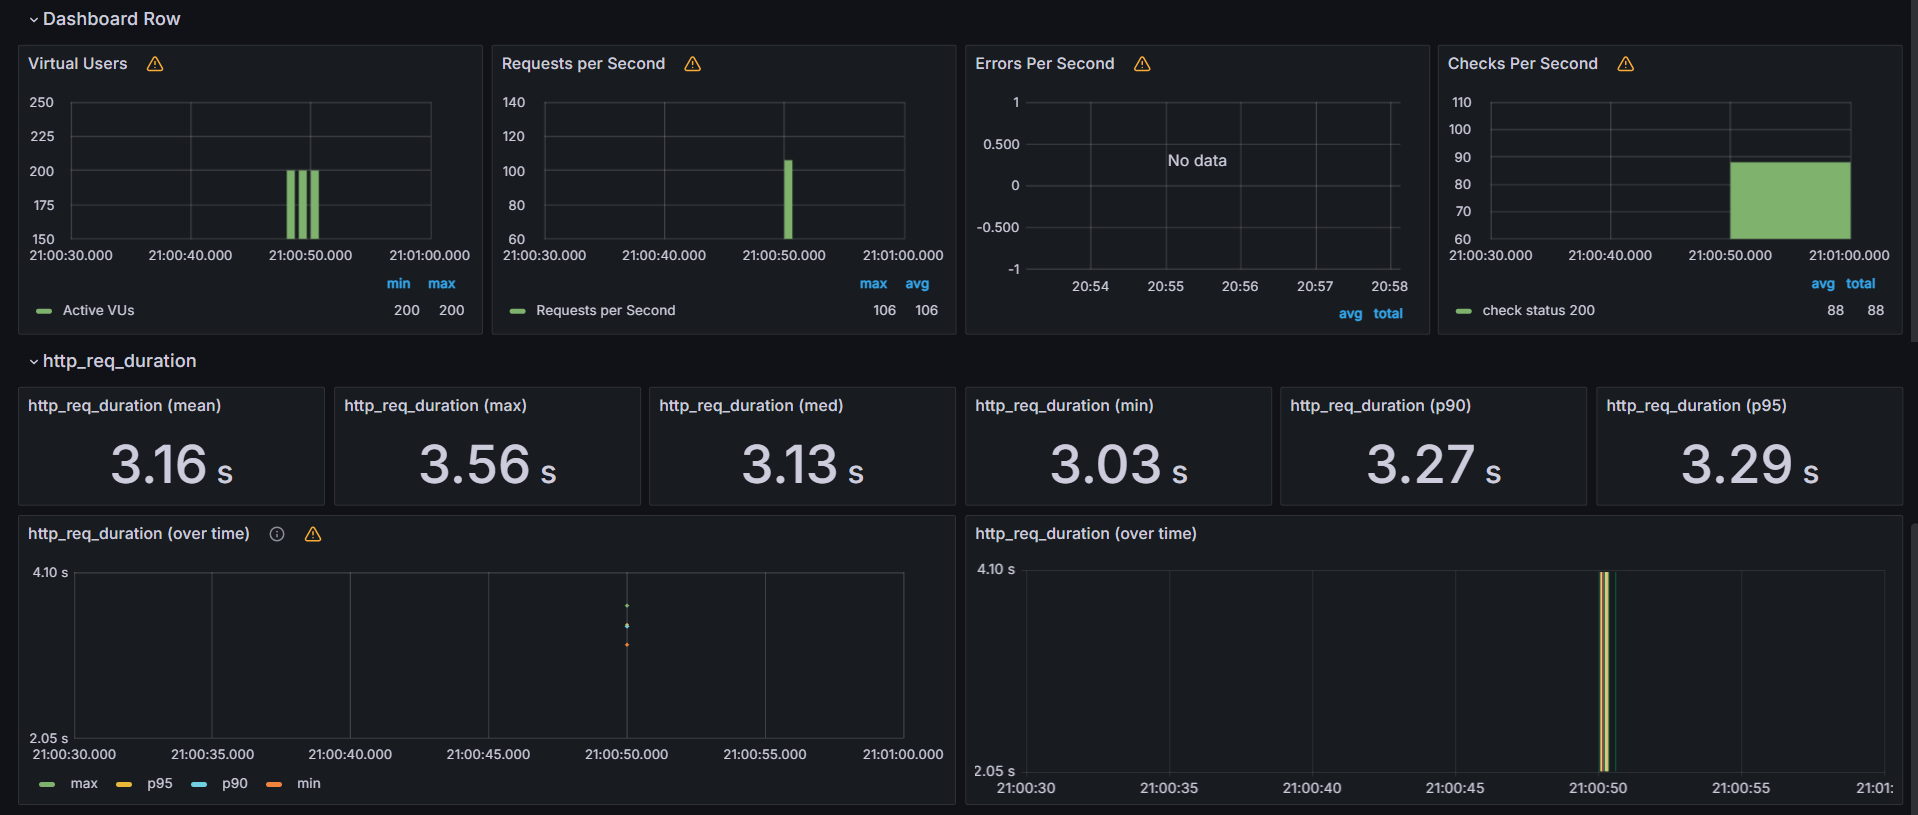
maxThreads = 200이므로 200개의 요청은 동시에 처리 가능하다
2. 300 Requests

| Execute (maxThreads) | Tomcat Connector Queue (maxConnections) | |
|---|---|---|
| Step 1 | 200 | 100 |
| Step 2 | 100 | 0 |
300 Requests & 200 maxThreads이므로 동시에 처리 가능한 최대 Connection은 200이고 200개의 Connection이 먼저 처리된다- 남은 100개의 Connection들은 Accept 후 Tomcat Connector Queue에서 대기한다
- maxConnections는 8192이므로 100개의 Connection을 추가로 받는것은 아무 문제가 없다
- 이후 Connection 처리를 완료한 Idle Thread들이 Connector Queue의 Connection들을 처리한다
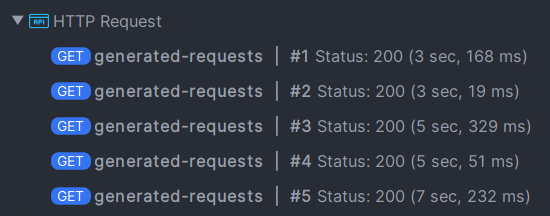
3. 1000 Requests

- 마찬가지로 200개의 Connection들은 maxThread[200]에 의해 먼저 처리
- 남은 800개의 Connection들은 Tomcat Connector Queue에서 대기
- 이 후 순차적으로 200개씩 추가 처리
- 따라서 Step 5에서 처리되는 200개의 Connection들의 duration은 약 15초가 걸린것이다
- 각 Task별로 3000ms의 지연시간 고려
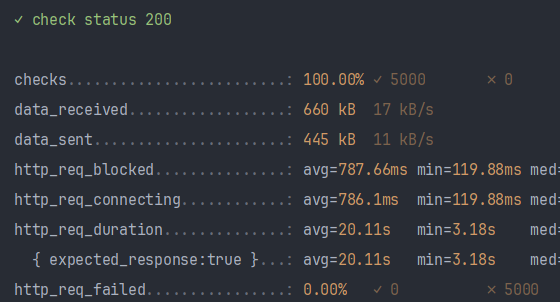
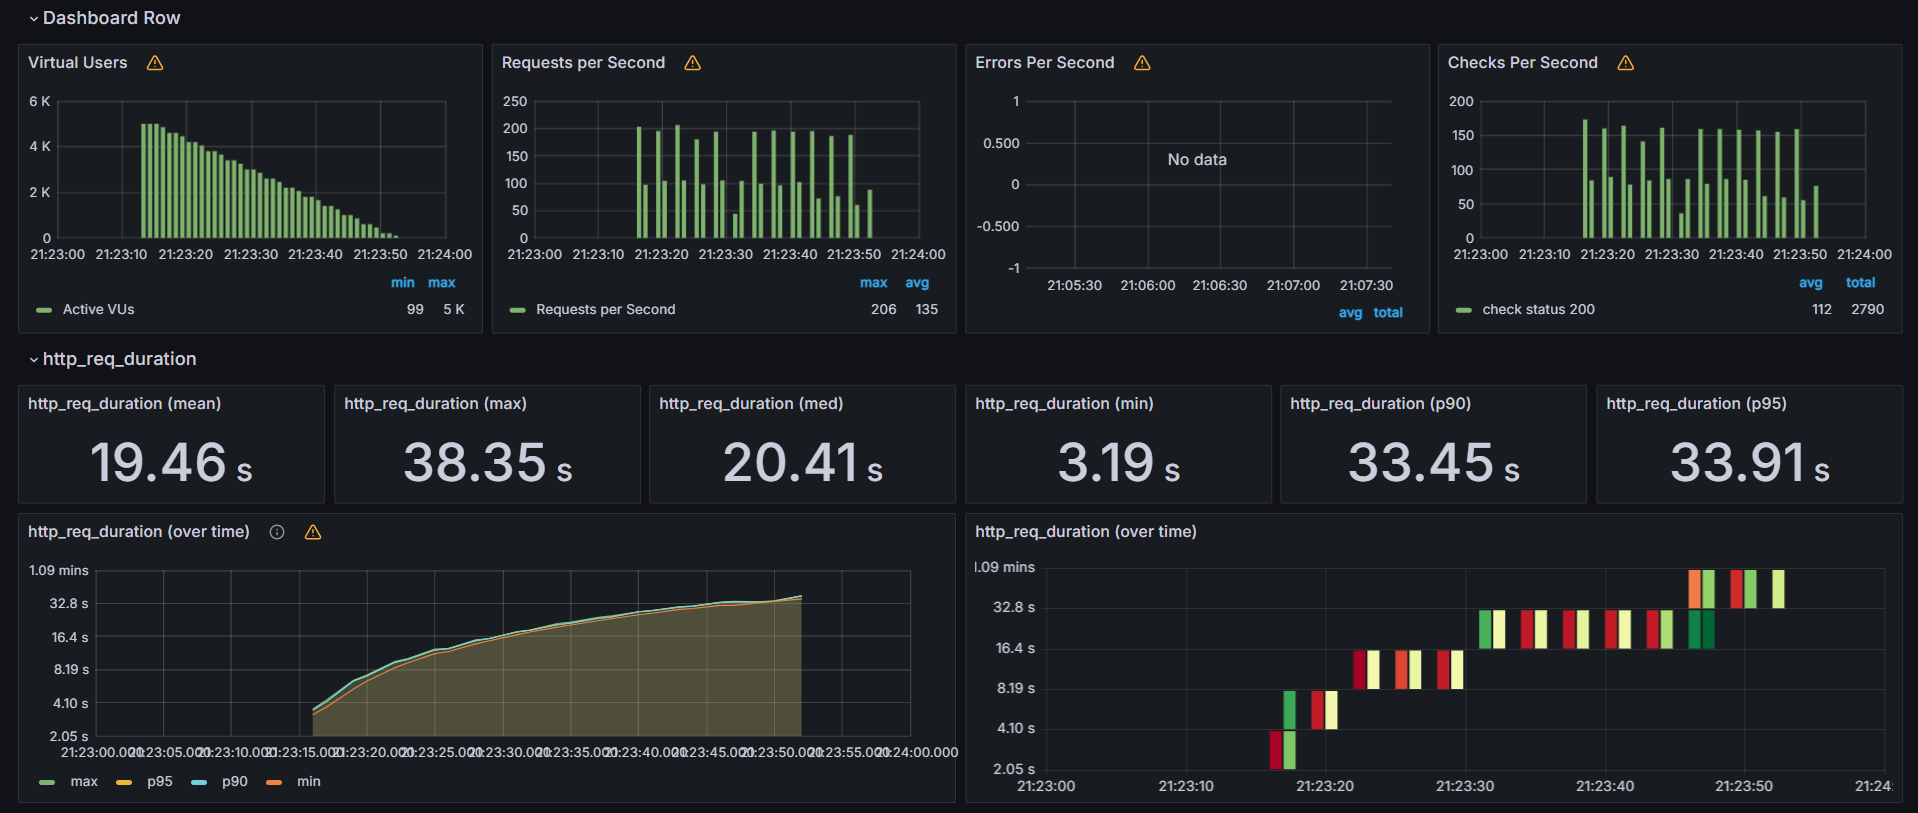
4. 5000 Requests
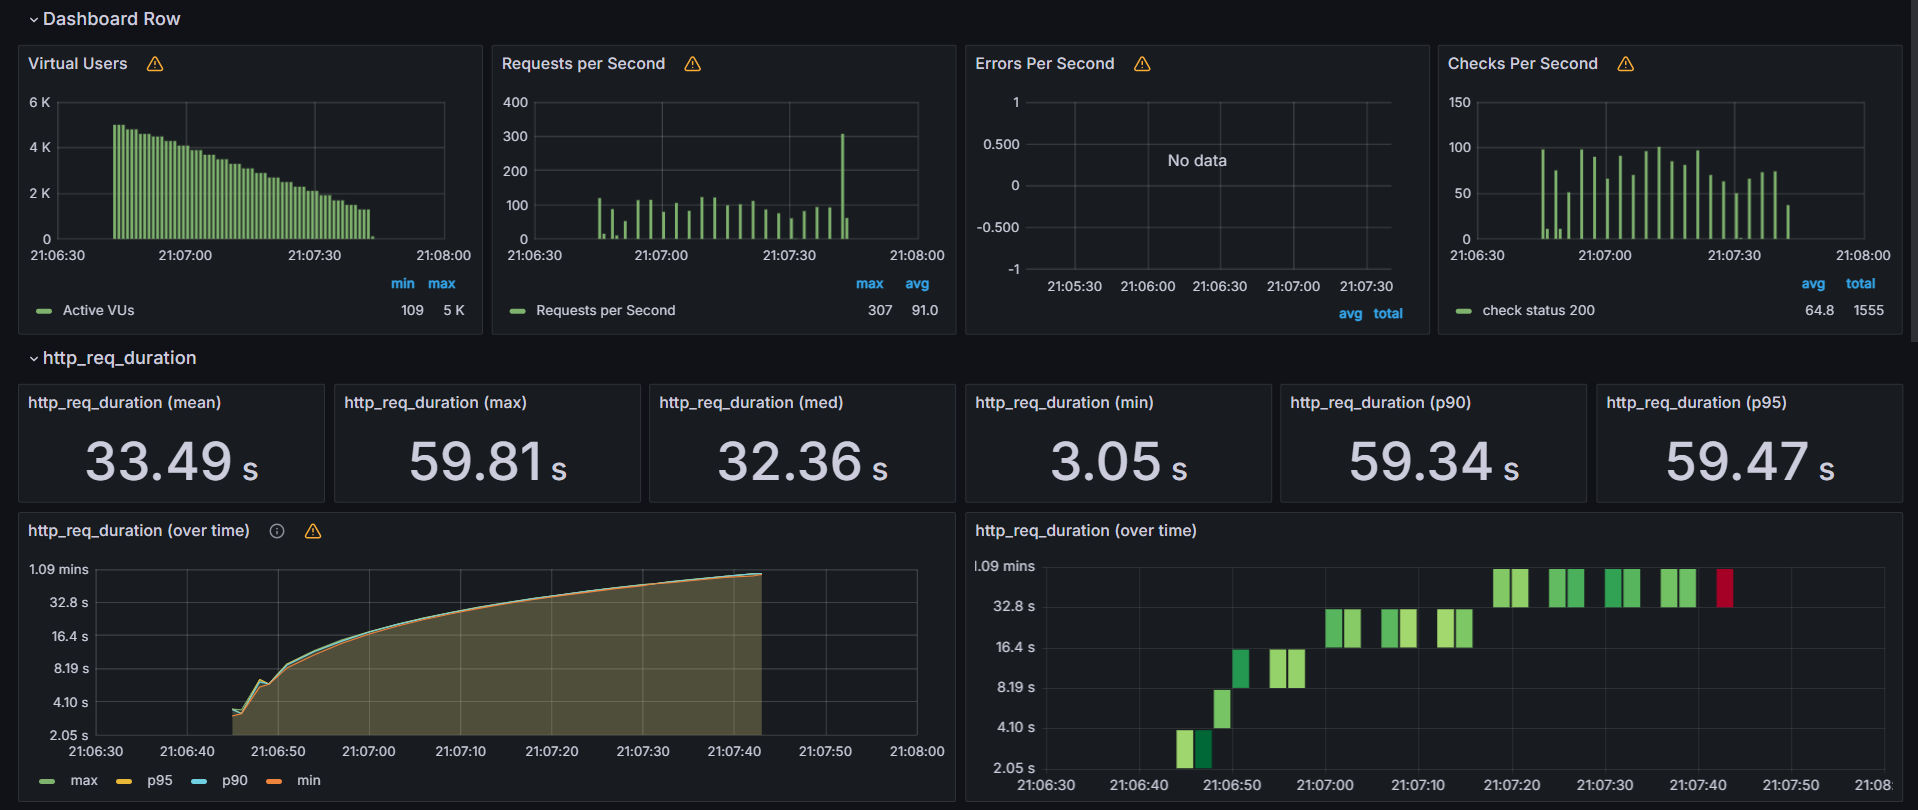
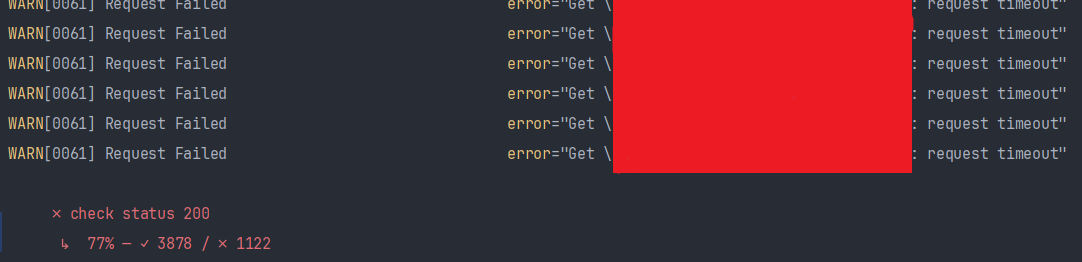
- 드디어 기본 설정으로는 한계에 도달한듯 보인다 (Request Timeout)
maxThread는 기본값에 의해 200이고 현재 동시 요청은 5000개가 들어간 상황이다
이 경우 가장 나중에 진입하는 Connection들은 (5000 / 200) × 3 = 75s를 대기해야 하는 것이다
그런데 timeout 로그가 60s경에 찍힌 사실을 토대로 최소 15s는 단축해야 한다고 유추할 수 있다
- 어떤 방식을 적용해서라도 전체적인 응답을 최소 15s는 빠르게 가져와야 한다
maxConnections과의 연관성은 현재 maxConnections은 기본값 8192로 적용되어 있기 때문에 Tomcat Connector Queue는 5000 Requests를 충분히 Accept할 수 있다
결국 일을 하는 Thread가 부족하고 일을 빨리빨리 처리하지 못하니까 timeout 문제가 발생한 것이다
- maxThreads를 늘려보자 (200 to 400)
- maxThreads를 늘림으로써
처리할 수 있는 최대 동시 요청 수또한 늘어나고 그 결과로 5000 Requests도 성공적으로 모두 처리할 수 있게 되었다